Step into a delightful world of nostalgic sweetness with a treat that's as simple to make as it is utterly charming: cream cheese mints. These old-fashioned candies are a testament to the idea that the best things in life are often the easiest to create. If you've ever wondered how to make cream cheese mints that are soft, melt-in-your-mouth delicious, and incredibly versatile, you've come to the right place. Forget complicated candy thermometers and tedious cooking processes; this no-cook recipe will have you whipping up a batch of these exquisite confections in mere minutes.
The Timeless Appeal of No-Cook Cream Cheese Mints
There's something uniquely comforting about a classic recipe that has stood the test of time, and cream cheese mints perfectly fit the bill. These delightful morsels are more than just a sweet treat; they're a trip down memory lane for many, evoking cherished memories of family gatherings, holiday celebrations, and special events. Their simple elegance and refreshing flavor make them an enduring favorite, proving that some traditions are simply too good to fade away.
Unlike many traditional candy recipes that demand precise temperatures and intricate techniques, homemade cream cheese mints embrace simplicity. The "no-cook" aspect is a game-changer, making this recipe incredibly accessible for bakers of all skill levels, even those new to candy making. This ease of preparation means you can spend less time fussing in the kitchen and more time enjoying the company of your guests or simply savoring these delightful creations yourself.
Beyond their ease, cream cheese mints are also incredibly versatile. Often affectionately referred to as "wedding mints," these candies have long been a popular favor for weddings, bridal showers, and baby showers. Their delicate pastel hues and soft texture make them an ideal addition to any celebration, adding a touch of sweetness and charm. But you don't need a grand occasion to justify making them. A simple Tuesday afternoon can be transformed into a special moment with a batch of these sweet, refreshing treats. They are a beloved choice for holidays like Easter, Christmas, and Valentine's Day, allowing you to customize their colors and flavors to match any festive theme. For more ideas on how to incorporate them into your special events, check out our guide on Homemade Cream Cheese Mints: Sweet Treats for Holidays and Parties.
Mastering the Simple Ingredients for Perfect Mints
One of the most appealing aspects of this cream cheese mints recipe is its reliance on a handful of everyday ingredients. You won't need to hunt for exotic items; everything required is likely already in your pantry or easily found at your local grocery store. However, the secret to truly outstanding cream cheese mints lies not just in the ingredients themselves, but in selecting the right kind and preparing them properly.
Essential Ingredients List:
- Full-Fat Cream Cheese: The star of the show, providing the signature creamy texture.
- Powdered Sugar (Confectioners' Sugar): For sweetness and to bind the mixture.
- Unsalted Butter: Adds richness and helps achieve that melt-in-your-mouth softness.
- Pure Vanilla Extract: Enhances the overall flavor profile.
- Pure Peppermint Extract: The essential flavoring for that classic mint taste.
- Gel Food Coloring: To customize your mints with vibrant hues.
Key Ingredient Insights:
- Cream Cheese is Key: Always opt for full-fat cream cheese. Low-fat or whipped varieties simply won't yield the same rich texture and flavor. It's crucial to let your cream cheese soften fully at room temperature before mixing. This ensures a smooth, lump-free dough and prevents overmixing.
- Powdered Sugar Power: Powdered sugar (also known as confectioners' sugar) is vital. Its fine texture dissolves easily, creating a silky-smooth dough. Gradually adding it is important to avoid a "sugar storm" and ensure even incorporation.
- Butter for Richness: A small amount of unsalted butter goes a long way in adding a luxurious richness and contributing to the mints' tender, soft consistency. Like cream cheese, ensure it's softened.
- Vanilla's Supporting Role: Pure vanilla extract doesn't just add its own flavor; it subtly enhances the peppermint and rounds out the sweetness, making the mints taste more complex and delicious.
- Peppermint vs. Mint: This is where precision matters! Use pure peppermint extract. Avoid "mint extract" or "spearmint extract," as these can sometimes give your mints an unpleasant, toothpaste-like flavor. Peppermint extract provides that clean, crisp, classic minty taste we're aiming for.
- Gel Food Coloring for Vibrancy: Gel food colorings are superior to liquid dyes for this recipe. They deliver intense, vibrant colors without adding excess moisture to your dough, which could alter the consistency. Start with a tiny amount and add more gradually until you achieve your desired shade.
Understanding the role of each ingredient is the first step in mastering how to make cream cheese mints that are truly exceptional. For a deeper dive into ingredient selection and customization, explore our article: Craft Perfect Cream Cheese Mints: Simple Ingredients & Customization Guide.
Step-by-Step Guide: How to Make Cream Cheese Mints Effortlessly
The beauty of this cream cheese mints recipe lies in its straightforward, no-fuss process. You don't need any special equipment beyond a mixing bowl and a hand mixer, making it perfect for an impromptu treat or a fun activity with kids. Here’s your detailed guide to creating these delightful candies.
Preparing Your Mint Dough:
- Soften Ingredients: Ensure your full-fat cream cheese and unsalted butter are at room temperature and fully softened. This is paramount for a smooth, lump-free mixture.
- Combine Wet Ingredients: In a large mixing bowl, combine the softened cream cheese, butter, pure vanilla extract, and pure peppermint extract. Using a hand mixer, beat these ingredients together until they are well combined and creamy. Scrape down the sides of the bowl as needed to ensure everything is incorporated.
- Gradually Add Powdered Sugar: With the mixer on low speed (to prevent a "sugar storm"), gradually add the powdered sugar to the bowl. Start with about half of the sugar, mix until mostly incorporated, then add the remaining sugar a little at a time. Continue mixing until all the sugar is fully incorporated and the mixture forms a soft, pliable dough.
- Test Consistency: The dough should be soft but not sticky, and easy to handle. To test, take a small piece and try to roll it into a ball. If it feels too sticky, add an additional tablespoon or two of powdered sugar, mixing until just combined, until you reach the desired consistency. Be careful not to add too much, or your mints might become crumbly.
Adding Vibrant Colors:
This is where the fun really begins! Customizing your mints with various colors is incredibly easy and allows you to tailor them to any theme or occasion.
- Divide the Dough: If you're planning multiple colors, divide the mint mixture into separate bowls – one for each color you intend to use.
- Add Food Coloring: Add a tiny amount of gel food coloring to each bowl. Start with a toothpick-sized dab, as gel colors are very concentrated. Mix well with a spoon or your hands (wearing gloves is recommended to prevent stained hands). Continue adding small amounts of coloring until you achieve your desired shade. Remember, you can always add more, but you can't take it away!
Shaping Your Mints:
Once your dough is colored, it’s time to shape them into beautiful, bite-sized candies.
- Roll into Balls: Take small portions of the colored dough (about ½ to 1 teaspoon, depending on your desired mint size) and roll them into smooth, uniform balls between your palms.
- Flatten and Decorate: You have a few options for shaping:
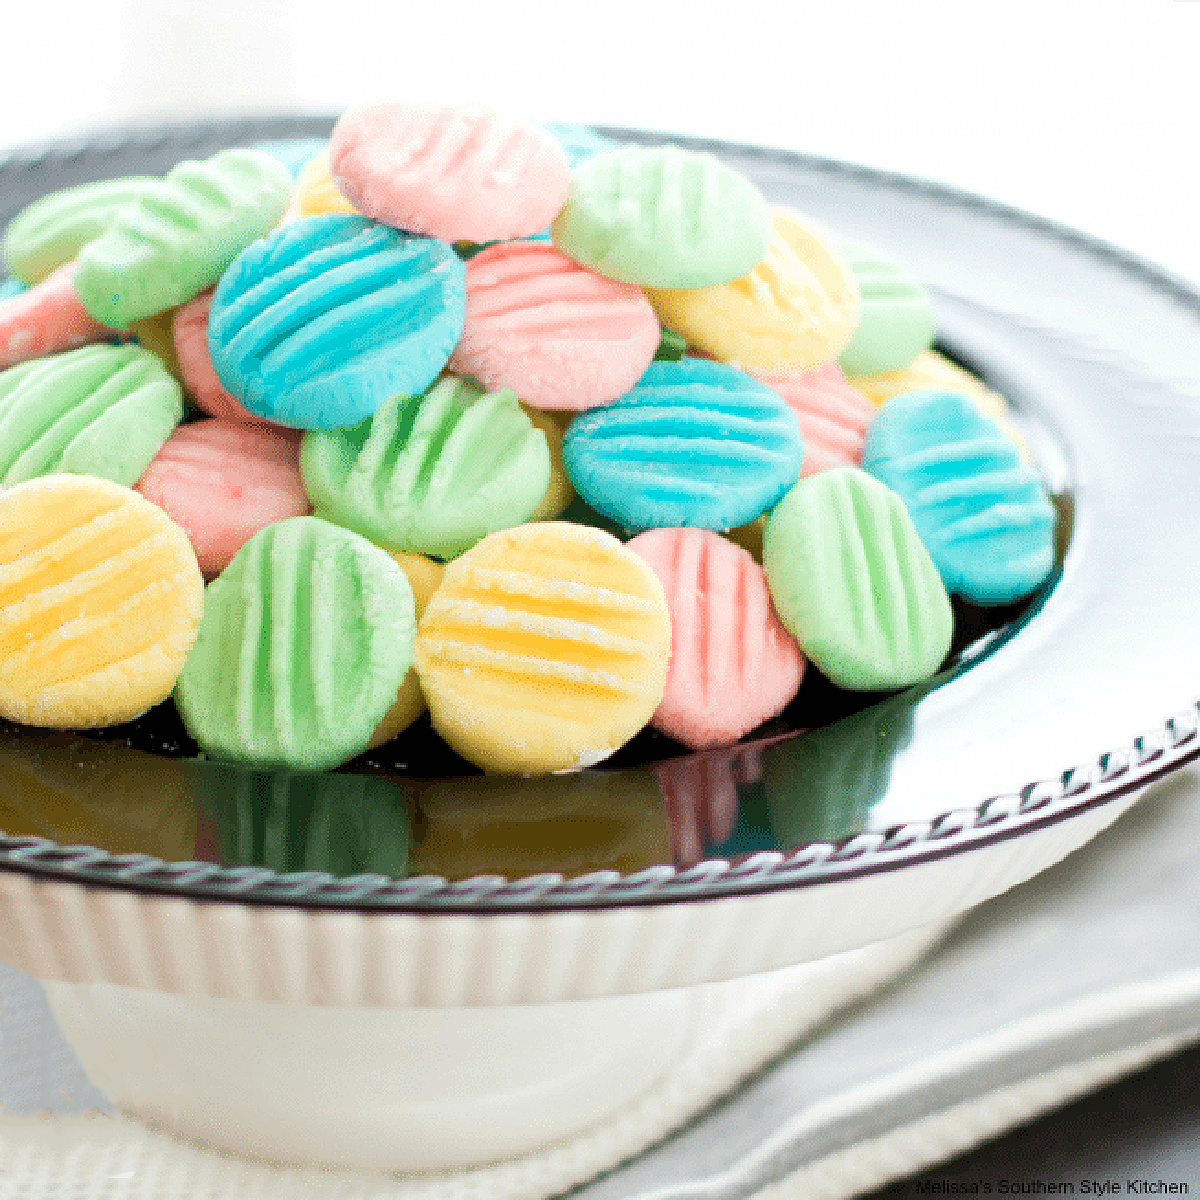
- Classic Fork Impression: Place each ball on a piece of parchment paper. Gently press down on the ball with the tines of a fork to flatten it slightly and create a decorative ridged pattern.
- Candy Molds: For more intricate designs, lightly grease and flour small candy molds (such as silicone flower, leaf, or heart molds). Press the dough firmly into the molds, then carefully pop them out.
- Sugar Coating: For an extra touch of sweetness and sparkle, gently roll the shaped mints in granulated sugar immediately after shaping.
- Set the Mints: Arrange the shaped mints on a baking sheet lined with parchment paper. Allow them to air dry at room temperature for several hours (or overnight) until they firm up slightly on the outside. Alternatively, you can chill them in the refrigerator for about 30-60 minutes to speed up the setting process, though air-drying results in a slightly better texture.
Customization & Serving: Making Mints Your Own
The versatility of easy cream cheese mints extends far beyond their simple preparation. They offer a canvas for creativity, allowing you to personalize them for virtually any event or personal preference.
Unleash Your Creativity:
- Flavor Variations: While peppermint is classic, don't be afraid to experiment! Try substituting a different extract for a portion of the peppermint. A hint of almond, lemon, orange, or even coconut extract can create exciting new flavor profiles. Imagine delicate rosewater mints for a bridal shower or vibrant lime mints for a summer party.
- Shape Shifters: Beyond the traditional fork-pressed rounds, invest in small silicone candy molds. Flowers, leaves, hearts, stars, or even miniature seasonal shapes can elevate your mints from simple to stunning. This is particularly effective for themed events, adding a professional touch without extra effort.
- Decorative Toppings: A simple dusting of edible glitter or pearl dust can add a touch of elegance. For holiday mints, consider edible sprinkles, nonpareils, or even a tiny amount of edible gold leaf for a truly luxurious feel.
Serving and Storing Your Homemade Delights:
Once your cream cheese mints have set, they're ready to be enjoyed! Arrange them artfully on a platter for guests, package them in small cellophane bags as party favors, or simply keep them in an airtight container for a sweet treat throughout the week.
- Storage: Store your finished mints in an airtight container. They will keep well at room temperature for up to a week. For longer storage, you can refrigerate them for up to two weeks, or even freeze them for up to a month. If freezing, arrange them in a single layer on parchment paper, freeze until solid, then transfer to a freezer-safe bag or container. Thaw at room temperature before serving.
- Presentation: Consider serving them in small decorative paper cups or on a tiered dessert stand to showcase their beautiful colors and shapes. They make an excellent addition to dessert tables, cookie platters, or as a thoughtful homemade gift.
The process of how to make cream cheese mints is not just about creating a confection; it's about creating memories and spreading joy. These simple, no-cook delights are a testament to the fact that some of the most cherished treats are the ones made with love and a sprinkle of tradition.
Whether you're a seasoned candy maker or a kitchen novice, this recipe offers an incredibly rewarding experience. From the joy of mixing and coloring the dough to the satisfying moment when friends and family rave about your homemade treats, cream cheese mints are truly a delight. So go ahead, gather your ingredients, and embark on a sweet journey back in time with these easy, old-fashioned, melt-in-your-mouth mints. You'll quickly discover why this timeless recipe remains a beloved classic for every occasion, big or small.
